Roofing

Roofing Contractor

Roofer West Chester PA work on domestic and commercial buildings, repairing, replacing and constructing the roofs. Their duties may include attending customer call-outs, assessing storm damage and repairing rotten or missing shingles.

Roofers have a range of skills that are critical for their jobs, such as coordination and active listening. They also use a number of tools and techniques to perform their duties.

It’s a roofer’s job to fix leaks, cracked housings and broken seams. Get into the attic or crawlspace if necessary, and examine the ceiling for water stains, black marks or mold. If you find any, start tracing them back to see where the water is coming from – dark streaks in the ceiling usually indicate a leaking roof vent. Also look for deteriorating home insulation, which should be replaced.

While you’re in the attic or crawlspace, inspect for bent flashing (thin sheet metal around areas such as pipes). It will need to be resealed, which can sometimes be done by simply bending it back into place with your hands, but may require pliers. Alternatively, you may need to cut off the old sealant with a utility knife, and then apply fresh caulk.

Maintenance

A roofer performs routine maintenance on roofing systems. This includes inspecting the roof structure, repairing minor damage and ensuring that all materials are in good condition. They also clean gutters and downspouts, trim tree branches and bushes that hang over the roof, and repair leaks around skylights, vents and chimneys. They use ladders, harnesses and fall protection equipment when working at heights. They may also use specialized tools like shears and tin snips.

Other maintenance tasks include cleaning and painting gutters and downspouts, repairing leaky vents and chimneys, and sealing all cracks in the foundation of the home.

Material

The roof is the most important part of a building and it protects against rain, snow, sunlight, wind and extremes of temperature. It is also an opportunity to add value and character to your home’s appearance. Choosing the right roofing material is essential to its longevity and performance. There are a variety of choices, from shingles and clay tiles to wood shakes and steel panels. There are even new engineered materials that offer the look of natural wood or slate with improved durability.

A variety of roofing materials can be found on the market today, but some are better than others for certain weather conditions. For example, some roofing materials don’t work well in damp climates and may require extra maintenance to keep them dry. Others are flammable and may need to be treated with fire retardants or chemical preservatives.

Choosing the best material for your roof will depend on local weather conditions, the architectural style of your home, and your budget. The most popular choice for modern homes is metal roofing, which comes in a variety of colors and styles to complement any exterior design. Some types of metal can last for decades and are available in a wide range of thicknesses to fit any home’s aesthetic and budget.

Another popular option is shingle-style roofs, which come in a variety of styles and colors to suit any exterior. Some are crafted from natural wood, such as cedar or redwood, while others are manufactured with recycled materials. These shingles are more lightweight and less expensive than many other roofing options, but they do not provide as much insulation or protection against the elements.

Regardless of the type of roofing material chosen, sheathing is an integral part of the roof structure and provides the foundation for the rest of the roofing system. Sheathing is usually a layer of plywood or a similar material, which must be water-resistant and strong enough to support the weight of the roofing material. In some cases, concrete sheathing is used, which is particularly effective for high-rise buildings and other structures with very steep slopes.
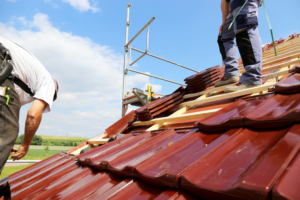
Installation

Roofing involves the construction and installation of the protective covering or structure that forms the topmost part of a building or other structure. It protects against rain, snow, sunlight, extremes of temperature, and other elements. Roofs can be built in a variety of ways, including flat or sloping surfaces and domed or vaulted structures.

Besides the obvious benefit of providing protection from weather elements, a well-installed roof adds to the value of your home. It also improves energy efficiency and may help with soundproofing. It’s important to select a reputable contractor when having your roof replaced or installing a new roof. Look for a company with local references, an active license and certifications, and excellent Better Business Bureau ratings. Also, check with your homeowners insurance agent to see if there are any restrictions on the type of roofing materials allowed in your area.

Your roofing professional will begin by removing any existing roofing materials and cleaning up the work area. Then, they will install the underlayment. This material is a waterproof barrier that’s installed over the sheathing and under the shingles. It’s made from heavy plastic or rubber and covers the entire deck of the roof. It closes around nails and provides a watertight seal.

The roofing contractor will then lay the shingle over the underlayment, nailing it in a pattern that alternates with rows of close and spread out nails. The shingle row in the center is usually spaced farther apart than the others. A ridge cap shingle is then installed at the top of the roof to provide a finished appearance and to prevent wind uplift.

Your roof may have penetrations for sewer vents, ductwork, chimneys, skylights, and plumbing vents. These are called flashing and are installed in the joints where different planes of the roof meet. Your roofing professional will install flashing that is compatible with the type of roofing you have on your house.

Maintenance

A roof is an important part of any structure, protecting the interior from rain, snow, sunlight, wind, and extremes of temperature. It is constructed in a variety of forms, including flat, pitched, vaulted, domed, and curved, as dictated by technical, economic, and aesthetic considerations. A variety of roofing materials are available, including asphalt shingles, tile, metal, and wood. Roofs are inspected and maintained on a routine basis to detect problems early and prevent serious damage.

The most common maintenance activities are to inspect the condition of shingles and other roof surfaces on a regular basis, remove debris from drains, re-flash openings in penetration base flashings, re-seal leaking gutters and downspouts, repair cracks in masonry or asphalt shingle siding, and replace loose or deteriorating caulking around vent pipes, chimneys, and other accessories. Depending on weather conditions, some areas of the roof may require more frequent attention than others. During the inspection process, it is often helpful to look for signs of water leaks inside buildings, as well as to note any moss or lichen that is growing on the shingles.

Another maintenance activity is to clean the roof surface of algae, mold, mildew, lichen, and moss. Depending on the type of roof, this can be accomplished by washing it with soap and water or using a chemical treatment. Keeping the roof free of these contaminants can prolong the life of the roofing system and improve its appearance.

During the inspection process, it is also helpful to check for any damage to roof trusses or beams caused by weather and other events. It is also a good time to trim trees that hang over or touch the roof, especially if they are growing rapidly. During this inspection, it is also important to make sure that safety procedures are followed, particularly when there is electrical equipment, harmful chemicals, or hot pipes on the roof.

The roof has flashing around the chimney and vent pipes to help prevent water from leaking into the house. This can be re-caulked on an annual basis to prevent the leaks.

Repairs

Roof repairs are a great way to address issues that arise from time to time. They can fix leaks, repair damaged shingles or other materials, and can help prolong the lifespan of your roof. Repairs can also be more cost-effective than a replacement project, making them an appealing option for budget constraints or homeowners looking to save money.

When dealing with damage to your roofing, it’s important to act quickly. Waiting until you start to see visible signs of leaking or your roof is buckling can lead to further problems and costly repairs.

The decision to repair or replace your roof will largely depend on how extensive the damage is, how old your roof is, and what kind of budget you have available for this home improvement project. Both options have their pros and cons, so it’s important to understand the differences between them before making a final decision.

Uncategorized

Incredible Tips That Will Jumpstart Your Social Media Marketing

Many companies use social networks to promote their products and interact with their customers. It doesn’t take a lot of money to promote your business on social media sites, especially not when considering how effective the promotion can be. The following article will give you some useful tips on this kind of marketing.

Promoting your business can be easier with Twitter. When you take time and learn how Twitter operates, you can have your business looked at by a lot of people. Taking a few days to learn about Twitter-specific functionality such as hashtags, keywords, and the API can really pay off.

Make sure that your social media strategy links up with your target audience on the networking sites that they tend to favor. Most people use social media sites on a daily basis, so giving them quick access via Facebook, Linkedin or Twitter is a great way to make sure they have instant access when you put up a new post.

Check out the Facebook game app platform for marketing ideas. Creating a game around your product or service will be a fun way to introduce it to a large audience. Some games even turn into viral phenomenons and are played by millions of users. If you are able to pay the price, you can hire a professional to design a game about your niche. Then you can share your game on Facebook.

When you place advertising on your social media pages, pay attention to the location of the ads on the page. Even if the page where your ad is located gets a lot of visits, you will not benefit from it if your ad is not noticeable.

From the tips above, you can tell that social media marketing isn’t nearly as complicated as it initially seems. Take advantage of the suggestions you’ve read here, and you’ll see for yourself how social media can help your business grow.

You can also visit our other websites and post your article.

Bowman Bros Garage Builders, Gainesville Remodeling, Cabinet Finishing Dallas, Coast Mountain Catering, Carpet Cleaning Bath, Adrian Carpet Cleaning, Animal Land Pest Control, Best Las Vegas Mortgage, The Fencing Contractors, Green Ethanol Fireplaces, Durability Garage Doors, Tow Truck Warren MI, NDX Trading, Grand Rapids Air Duct Pros, Montgomery County Plumbing HVAC, Mesquite Windshield Repair, Local Advanced Home Repairs, Wedding Photography Brighton, Ballard Septic, DIY Door Furniture, Mainstreet Carrollton KY, Chelsea’s Critter Care, Yamamoto Wood Worker, The Youth Radio Network, The Jameson Law Firm, Arbor Tree Incorporated, Mountain Resource Center, Modern AVNC, Milten Berger Family Law, Kitchen And Bath Express, Cabinets Lima Ohio, Best New Orleans Orthodontist – Best Blog For Orthodontists, Delta Towing Service, Black Smith Towing, Directory Accounting, E-Technology News, Joan Lawman Beauty, Dynamic Fence Raleigh, JT Electric Company, Fishing Real Estate For Sale, Directory Accounting, E-Technology News, Joan Lawman Beauty, Dynamic Fence Raleigh, JT Electric Company, Fishing Real Estate For Sale, Eldorado Tree Trimming, Rock Stone Fireplace Design, Derby Mowers, Final Level Radio, Tampa Photographer Blog, Alleged Entertainment, Smith And Wesson Weddings, Loving Care at Home, Crystal Rose Catering, Brooklyn Orthodontics

Garage Door
Uncategorized

Garage Door Installation Guide

CHECKING THE MATERIALS-Check all the parts and tools against the list that follows. Ensure that the door section is free of damage from shipping or handling.

Find the bottom section of the new door. Support the section on padded sawhorses while you work on it. Find the cable drums and the center bearing plate and start their set screws.

1. Measure the Opening

Take some basic measurements to determine the size of your garage door opening. This will help you decide what type of garage door to purchase and how many tracks you will need. Start by measuring the headroom, or the distance from the top of your garage opening to the ceiling (or lowest obstruction at the ceiling, such as rafters or fluorescents).

Also measure the width of the areas beside the door opening on either side. Make note of any wires or other obstacles that could obstruct the installation process.

During this step, you’ll need two installers to lift the rail assembly and guide assemblies into place against the jambs. Attempting to do this by yourself may result in serious injury or damage to the door. Therefore, it is recommended that you use locking pliers to secure the bottom of the guides to the brackets for stability during this step.

2. Measure the Tracks

To ensure a proper fit of your new garage door, you need to measure the areas on either side of the opening. You also need to know the headroom required.

Using your tape measure, find the distance between the top of your garage door and the ceiling. Make sure you don’t include the wood jamb in this measurement. Also, check for obstructions like rafters or overhead storage that might interfere with your installation.

This is a crucial step, as it ensures that your garage door will operate smoothly and safely. It also helps you choose the right track size and avoid any potential problems down the road. Proper measurements will also prevent any mismatched components from being installed, which could lead to damage. Luckily, measuring the track radius is fairly simple. Just follow these easy steps to get the job done!

3. Measure the Hinges

Hinges might seem insignificant but they play a big role in keeping your garage door functioning properly. They support the weight of the doors and allow them to move quickly, so they are definitely not something you want to neglect. In fact, if you don’t keep them well-maintained they might break down sooner than expected.

Fortunately, you can avoid this by learning about the different types of hinges and how to measure them. Most garage door hinges have a number printed on them that indicates where they should go on the garage door panels. For instance, #1 hinges usually go in the center while #2 hinges go between the second and third panel. The number also shows the gauge size, which differs from the hinge’s flat base to where it screwed into place. This difference allows you to pick a hinge that matches the thickness of your garage door.

4. Measure the Rollers

The rollers, also called wheels, guide your garage door as it moves up and down the vertical and horizontal tracks. They are available in a wide variety of sizes and materials. Some even have built-in bearings and high life cycles.

For steel roller doors with a continuous curtain that consists of one large steel sheet, the dimensions required are slightly different to those for an aluminium roller door made from individual aluminium slats. This is because the ordering width takes into account the guides which vary in size between manufacturers.

Generally, the easiest way to determine the correct size rollers is to take them out of their hinge sleeve and inspect them. They should sit evenly in the hinge and have no wiggle room, which can create noise or cause your door to get off track.

5. Measure the Tracks

Proper track measurements are essential to the smooth operation and safety of your garage door. Measuring the radius of your tracks is a simple process that can be done with any standard tape measure. This measurement will help determine headroom requirements, which is the amount of space above the door that is required for the extension and torsion springs, motor, and connections.

To measure the headroom, stretch your tape measure from the top of the opening to the ceiling or nearest obstruction above it. Then subtract your garage door height to find the headroom requirement for your chosen track type. Side room is also important, and you’ll want to make note of any areas that might be obstructed by beams or rafters. You’ll need a minimum of 5 inches on each side for mounting the vertical tracks.

6. Measure the Door

To install a door handle, first determine the desired height for the handle. Use a tape measure to find the center point of the desired height and mark it with a pencil on the door. Next, using a bubble level, draw a vertical line on the door in accordance with your pencil mark.

Measure the width of the door frame in three places and write down the largest measurement. Also, measure the depth of the frame excluding brickmould and trim pieces. Finally, use a tape measure to understand the thickness of the existing door and record this information as well. Next, if the springs are not already wound, wind them according to the manufacturer’s instructions. Each turn of the winding bar increases spring tension by engaging one more tooth on the ratchet wheel. Do not exceed the recommended number of turns.

7. Measure the Hardware

Before beginning the door installation, secure a tape measure, a writing utensil and a notepad or other device to record the measurements you take. This will make the process much easier by allowing you to work faster without having to stop and remeasure.

Using the Iron handle set as a guide, mark screw-hole locations on your door panel. Make sure to use a drill bit that doesn’t break through the surface of the door panel.

Loosen the top lag screw on master plate and rotate the door toward the jamb to equalize the gap between the frame and the door. Once the gap is equalized, tighten lag screw. Be sure the locking tab in the guide fully engages with the notch on bracket. If not, the guide and bracket will fall during installation. This can cause serious injury or damage to the door.

8. Measure the Tracks

If you’re doing this on your own, secure a tape measure and a writing utensil or notepad to record your measurements. Also, have an assistant to help you lift and hold the door sections as you go along.

Start with the bottom section and assemble it in the rough opening, pressing the groove of one side against the ridge of the next panel above it. Then shim the end of the panel until it is dead level.

Repeat the process for each of the remaining panels, taking care to note any obstructions that require additional headroom. Be sure to pre-drill holes for the hinges connecting each panel to the track on both sides. Screw the tracks to the wall framing with lag screws. Tighten the screws as you go, but don’t tighten all the way yet.

9. Measure the Hinges

Hinges connect the sections of a garage door together and allow them to move smoothly. However, they can cause problems if they are not the correct size or gauge. In addition, if the hinges are not fastened properly they can become loose or even fall off altogether.

To avoid these problems, you should always take the time to carefully measure and mark your hinges. The best way to do this is by removing the middle hinge and spreading it out on a flat surface. This will give you accurate measurements of the length, leaf width and knuckle size of the hinge. You should also test the hinges to ensure they are properly positioned. This will help you save time and avoid mistakes that can lead to expensive repairs down the road. Using washable marking chalk is recommended, as this makes it easier to remove the marks later.

10. Measure the Rollers

The rollers on a garage door are responsible for supporting the weight of the panels and maintaining their position along the track. When they become worn down, the door snags on them and can cause serious damage over time. It is important to regularly check and replace the rollers as needed.

Most garage doors have standard-sized rollers with a shaft diameter of 7/16″. If you are replacing the rollers, it’s important to make sure the new ones are the same size.

Use a winding bar and slowly crank the springs until the pawl engages with the tooth of the ratchet wheel, then count the number of turns. Do not exceed the manufacturer’s recommended limit of turns or you could risk damaging your garage door. A professional can assist you with this task if necessary. Often, you can find replacement rollers at your local hardware store.